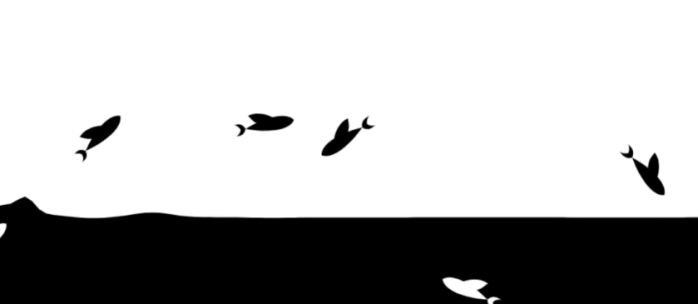


一、效果预览与核心目标
二、实现思路拆解
三、完整代码实现
1. HTML 布局:搭建基础结构
<!DOCTYPE html>
<html lang="zh-CN">
<head>
    <meta charset="UTF-8">
    <meta name="viewport" content="width=device-width, initial-scale=1.0">
    <title>网页底部养鱼效果</title>
    <!-- 引入CSS样式 -->
    <link rel="stylesheet" href="./style.css">
</head>
<body>
    <!-- 水池容器:所有动态效果将在这个容器内实现 -->
    <div id="fish-container" class="container"></div>

    <!-- 引入jQuery(简化DOM操作) -->
    <script src="https://cdnjs.cloudflare.com/ajax/libs/jquery/3.6.0/jquery.min.js"></script>
    <!-- 引入自定义JS逻辑 -->
    <script src="./script.js"></script>
</body>
</html>
2. CSS 样式:固定容器位置与外观
/* 重置页面默认样式:消除边距,避免滚动条干扰 */
html, body {
    width: 100%;
    height: 100%;
    margin: 0;
    padding: 0;
    overflow: hidden; /* 隐藏页面滚动条 */
}

/* 水池容器样式:固定在底部,作为动画载体 */
.container {
    position: fixed; /* 固定定位,不随页面滚动 */
    bottom: 0; /* 距离页面底部0px */
    left: 0; /* 距离页面左侧0px */
    width: 100%;
    height: 50%; /* 容器高度为屏幕的50% */
    background-color: #f0f8ff; /* 浅蓝色背景,模拟水面底色 */
    z-index: 1; /* 确保容器在页面底层,不遮挡其他内容 */
}

/* Canvas 画布样式:铺满水池容器 */
#fish-canvas {
    width: 100%;
    height: 100%;
    display: block; /* 消除Canvas默认的inline-block空隙 */
}
3. JavaScript 逻辑:实现动态与交互
(1)Canvas 初始化与全局配置
$(function() {
    // 1. 获取水池容器,创建Canvas元素
    const container = $('#fish-container')[0];
    const canvas = document.createElement('canvas');
    canvas.id = 'fish-canvas';
    container.appendChild(canvas);
    const ctx = canvas.getContext('2d'); // 获取Canvas绘图上下文

    // 2. 适配容器尺寸:确保Canvas铺满水池
    function resizeCanvas() {
        canvas.width = container.offsetWidth;
        canvas.height = container.offsetHeight;
    }
    resizeCanvas();
    window.addEventListener('resize', resizeCanvas); // 窗口 resize 时重新适配

    // 3. 全局配置参数:可根据需求调整
    const config = {
        waveAmplitude: 5, // 水面波动幅度(像素)
        waveFrequency: 0.02, // 水面波动频率
        waveSpeed: 0.1, // 水面波动速度
        fishCount: 8, // 鱼的数量
        fishSizeRange: [15, 30], // 鱼的大小范围(像素)
        threshold: 50 // 鱼超出屏幕的判定阈值(避免鱼突然消失)
    };

    // 4. 水面波动状态:记录波动的时间参数
    let waveTime = 0;

    // 后续代码将在这里继续...
});
(2)定义鱼的类:模拟物理行为
// 鱼的类:封装鱼的属性与行为
class Fish {
    constructor(renderer) {
        this.renderer = renderer; // 传入Canvas渲染上下文与尺寸信息
        this.init(); // 初始化鱼的状态
    }

    // 初始化:随机设置鱼的位置、速度、方向
    init() {
        const { width, height, reverse, threshold } = this.renderer;
        // 随机确定鱼的初始游动方向(true:从右向左,false:从左向右)
        this.direction = Math.random() < 0.5;
        // 初始X坐标:从屏幕外进入(避免鱼从屏幕中间突然出现)
        this.x = this.direction ? (width + threshold) : -threshold;
        // 初始Y坐标:根据reverse状态决定在水池的上半部分或下半部分
        this.y = reverse
            ? this.getRandomValue(height * 1/10, height * 4/10)
            : this.getRandomValue(height * 6/10, height * 9/10);
        // 速度:X轴速度(方向决定正负),Y轴速度(上下浮动)
        this.vx = this.getRandomValue(2, 5) * (this.direction ? -1 : 1);
        this.vy = reverse
            ? this.getRandomValue(1, 3)
            : this.getRandomValue(-3, -1);
        // 加速度:模拟鱼游动的“惯性”,让运动更自然
        this.ay = reverse
            ? this.getRandomValue(0.02, 0.08)
            : this.getRandomValue(-0.08, -0.02);
        // 鱼的大小:随机在配置范围内
        this.size = this.getRandomValue(config.fishSizeRange[0], config.fishSizeRange[1]);
        // 状态标记:是否超出屏幕(超出后重新初始化)
        this.isOut = false;
    }

    // 工具方法:获取指定范围内的随机数
    getRandomValue(min, max) {
        return Math.random() * (max - min) + min;
    }

    // 绘制鱼:用Canvas绘制简单的鱼形状(身体+尾巴+眼睛)
    draw(ctx) {
        ctx.save(); // 保存当前绘图状态
        ctx.translate(this.x, this.y); // 将原点移动到鱼的位置

        // 1. 绘制鱼身体(椭圆形)
        ctx.fillStyle = '#ff6347'; // 红色鱼身
        ctx.beginPath();
        ctx.ellipse(0, 0, this.size, this.size / 2, 0, 0, Math.PI * 2);
        ctx.fill();

        // 2. 绘制鱼尾(三角形)
        ctx.fillStyle = '#ff4500'; // 深红色鱼尾
        ctx.beginPath();
        const tailX = this.direction ? this.size : -this.size; // 鱼尾方向与游动方向一致
        ctx.moveTo(tailX, 0);
        ctx.lineTo(tailX + (this.direction ? 10 : -10), -this.size / 2);
        ctx.lineTo(tailX + (this.direction ? 10 : -10), this.size / 2);
        ctx.closePath();
        ctx.fill();

        // 3. 绘制鱼眼(圆形)
        ctx.fillStyle = '#000'; // 黑色眼睛
        ctx.beginPath();
        const eyeX = this.direction ? -this.size / 2 : this.size / 2; // 眼睛在头部
        ctx.arc(eyeX, -this.size / 4, this.size / 8, 0, Math.PI * 2);
        ctx.fill();

        ctx.restore(); // 恢复绘图状态
    }

    // 更新鱼的位置:每帧调用,实现游动动画
    update() {
        const { width, threshold } = this.renderer;
        // 1. 更新速度(加入加速度,让运动更自然)
        this.vy += this.ay;
        // 2. 更新位置
        this.x += this.vx;
        this.y += this.vy;
        // 3. 边界检测:鱼超出屏幕后,重新初始化(让鱼循环游动)
        if (this.direction && this.x < -threshold) {
            this.isOut = true;
            this.init();
        } else if (!this.direction && this.x > width + threshold) {
            this.isOut = true;
            this.init();
        }
    }
}
(3)水面波动与鱼群管理
// 继续在 $(function() { ... }) 内部编写

// 5. 初始化渲染器信息:传递给鱼的类,包含Canvas尺寸与状态
const renderer = {
    ctx,
    width: canvas.width,
    height: canvas.height,
    reverse: false, // 是否翻转鱼的游动区域(点击时切换)
    threshold: config.threshold
};

// 6. 创建鱼群:根据配置的数量生成鱼实例
const fishGroup = [];
for (let i = 0; i < config.fishCount; i++) {
    fishGroup.push(new Fish(renderer));
}

// 7. 绘制水面波动:用正弦曲线模拟水面
function drawWave() {
    const { width, height } = renderer;
    ctx.save();
    ctx.fillStyle = 'rgba(135, 206, 235, 0.5)'; // 浅蓝色半透明,模拟水面
    ctx.beginPath();
    // 从左下角开始绘制
    ctx.moveTo(0, height);
    // 绘制正弦曲线:x从0到width,y随waveTime变化
    for (let x = 0; x < width; x++) {
        const y = height - config.waveAmplitude * Math.sin(x * config.waveFrequency + waveTime);
        ctx.lineTo(x, y);
    }
    // 闭合路径,填充水面区域
    ctx.lineTo(width, height);
    ctx.closePath();
    ctx.fill();
    ctx.restore();
    // 更新波动时间参数,让水面持续动起来
    waveTime += config.waveSpeed;
}

// 8. 动画主循环:每帧更新并绘制所有元素
function animate() {
    // 清空Canvas:避免上一帧的图像残留
    ctx.clearRect(0, 0, canvas.width, canvas.height);
    // 绘制水面波动
    drawWave();
    // 更新并绘制鱼群
    fishGroup.forEach(fish => {
        fish.update();
        fish.draw(ctx);
    });
    // 循环调用动画帧:浏览器会自动优化帧率
    requestAnimationFrame(animate);
}

// 启动动画
animate();
(4)添加交互逻辑:鼠标与点击事件
// 继续在 $(function() { ... }) 内部编写

// 9. 鼠标交互:移动鼠标时生成水波涟漪
let mouseX = 0;
let mouseY = 0;
let isMouseActive = false; // 标记鼠标是否在容器内

// 监听鼠标进入容器事件
container.addEventListener('mouseenter', (e) => {
    isMouseActive = true;
    const rect = container.getBoundingClientRect();
    mouseX = e.clientX - rect.left;
    mouseY = e.clientY - rect.top;
});

// 监听鼠标离开容器事件
container.addEventListener('mouseleave', () => {
    isMouseActive = false;
});

// 监听鼠标移动事件:更新鼠标位置
container.addEventListener('mousemove', (e) => {
    const rect = container.getBoundingClientRect();
    mouseX = e.clientX - rect.left;
    mouseY = e.clientY - rect.top;
});

// 修改 drawWave 函数,添加水波涟漪效果
function drawWave() {
    const { width, height } = renderer;
    ctx.save();
    ctx.fillStyle = 'rgba(135, 206, 235, 0.5)';
    ctx.beginPath();
    ctx.moveTo(0, height);
    for (let x = 0; x < width; x++) {
        let y = height - config.waveAmplitude * Math.sin(x * config.waveFrequency + waveTime);
        // 如果鼠标在容器内,在鼠标位置添加额外波动(涟漪效果)
        if (isMouseActive) {
            const distance = Math.abs(x - mouseX);
            if (distance < 100) { // 只在鼠标周围100px范围内产生涟漪
                y -= config.waveAmplitude * 2 * Math.cos(distance * 0.05);
            }
        }
        ctx.lineTo(x, y);
    }
    ctx.lineTo(width, height);
    ctx.closePath();
    ctx.fill();
    ctx.restore();
    waveTime += config.waveSpeed;
}

// 10. 点击交互:点击页面翻转鱼的游动区域
$(document).on('click', () => {
    renderer.reverse = !renderer.reverse;
    // 重新初始化所有鱼的位置,让翻转效果立即生效
    fishGroup.forEach(fish => {
        fish.init();
    });
});
四、效果优化与扩展建议
五、技术总结
© 版权声明
文章版权归原作者所有,本站只做转载和学习以及开发者个人原创。声明:下载本站资源即同意用户协议,本站程序仅供内部学习研究软件设计思想和原理使用,学习研究后请自觉删除,请勿传播,因未及时删除所造成的任何后果责任自负。
THE END


暂无评论内容